Sunday, January 29, 2012

DIY Cardboard Play Fort with tunnels!

While we were out and about and waiting for my dad, I told Miguel to take a drive around the corner to see if there was any Hardware store open during this festive season.
I was looking for unsanded tile grout to start my chalkboard project.
I didn't manage to get it BUT
I managed to get some used boxes from a Moving Company who were in the midst of packing someone's goods up to be relocated.
Brought three boxes (2 tall ones and a shorter one) and got the blueprints in my head.

Got home and started assembling them!


Chago, as always, wants to help.
So he helped me sweep a little on the insides of the box. He did an excellent job!


And even inspected the boxes for me before I actually started assembling them.
He said it looks Great!


Put them together and made sure the the tapes were on right otherwise he would just end up loosening the joints up.


Holes looks right too.
Aha! Who have we got there with you Chago?


Where is he???


WHERE??


Still haven't spotted him?


We moved the fort into the house so he could play with everyone and anyone who came for a visit.
His aunt helped by adding some rafia string curtains on the inside :)

I got the older "kids" interested as well :D


Saturday, January 28, 2012

Getting his hands in Bread Flour

The lights went out and so it's hot and gloomy inside.
Chago was going round and round in circles.
Poor thing...
So mama be nimble, mama be quick!
Mama ran to the kitchen with some pots and sticks!
Mama got some bread flour and a packet drink...
And mama... placed them outside for Chago?

So okay Okay I KNOW!
I can't rhyme so let's just forget that for now.
Let's just enjoy the pictures... Shall we?


The texture of Bread Flour is much more softer and fluffier than wheat flour...


So... okay, the packet drink was meant for more mess but I guess Chago had a hidden agenda...


There you go!


"MUM! Now WHERE'S THE OVEN!!!"

:)
Till we get messy next time :)

Wednesday, January 18, 2012

Making Homemade Butter


I was looking through the net looking for an inspiration and looking for ways to make my own oils without spending a fortune on just buying them.
I was about to shut my lappy off when I suddenly had an idea about making my own nut oils.
In Google, I saw lots of articles about Nutty Butters...
Butter?

It took me awhile to figure that out...
Until I started reading.
And then comes the palm slap!
YES... Now I get it!
We have PEANUT butter in stores to spread on our bread, so walnut, almond, cashew, pistachio etc can also be made into Nutty Butters just like Peanut Butters! Only it's a whole lot healthier and yummier because you can custom whatever to suit it to your own taste buds.
I made to batches.
One for Us to eat - Almond + Sunflower Seeds + Pumpkin Seeds
and One for getting Almond Oil out of

Here's the SIMPLE RECIPE on how to make your own Butter for Consumption:
I promise, This Will be Easy!


Ingredients:
Almonds - I used about 200gms of Whole Unroasted Raw Almonds
Coconut Oil / Olive Oil - I used Coconut Oil because I prefer the smell and taste of coconut oil to olive oil. I find that Olive oil has this really strong Olive smell. 
Honey**
Salt**
Cinnamon**
Ground Nutmeg**

** are optional ingredients you might want to add in. I like to leave mine without the additional stuff so that I can experiment with different flavours when I spread them on my bread, or when I use them in cereals or making cookies / cakes

Tools:
A blender
A spoon to scoop out the Almond Butter
A clean and dry container for storing your Almond Butter

Method:
1. Place Almonds into the blender and blend them slowly at first using the impulse button and slowly increasing the speed.
2. Add a little bit of the oil of your choice and continue blending. The Almonds should start balling up inside. Use a wooden spoon to push the sides and even up on the insides but make sure the blender is turned off when you do this!! I say this because I know some people who actually does this while the machine is on!
3. You may want to add more oil if you find that the Almond is taking some time to actually become a creamy paste. Add a little bit at a time. You can try using a teaspoon at a time. Give it some time to blend. I think it took me about 15 minutes to blend. 
4. You now officially have your very own Pure Almond Butter!
5. Add in a pinch of salt / to taste, honey, cinnamon or nutmeg or whatever it is you are crazy about, mix them up and transfer them into a container for you to store your butter!
6. Store them in a nice cool place. I store mine in my refrigerator. Since Coconut oil does not harden up like a rock, it's actually quite easy to scoop out with a butter knife and spread it on toasted bread.
7. Serve them to any nut crazy kid/adult and watch them enjoy it :)


Chago loves his :)
I actually used Pumpkin and sunflower seed along with Almonds as mentioned above. It tastes more or less just like pure almond to me except the colour has a hint of green to it from the pumpkin seed.


This is Pure Hazelnut Butter which I made for the purpose of extracting its oil from.
The method of doing this is the same way as mentioned above. Just omit the extra stuff out.
I used Olive Oil for this.
I store this under room temperature.
Wait for 2 weeks and Hazelnut Oil will appear on the surface of the Almond meat!
Just get those oil and you'll have the oil you would need.
What can you use it for?

1. Add them into handmade lotions, soaps, shampoos and
Heck!
Why not?? Into commercial Lotions too!
2. Rub the oils directly on your skin. They will not feel oily or sticky on your skin. Use it as a serum for your face and your hair. Rub them on the rough and dry areas on your body i.e. Elbows, heels of your soles, knees, in between your toes and fingers, palms etc!

What to do with the meat?
Rub them on your face, or use them as a facial mask.
You can also use cheese cloth to squeeze all the oils out and use the meat in your soaps as an exfoliating agent.

Hope you find this useful :)
I love making homemade edibles for Chago and the adults :)
Great ideas for gifts too don't you think so?


Thursday, January 12, 2012

Bandana Bibs

Made these for someone special :)


And made another for my special someone :)


Reversible Bandana Bibs!
Great for messy eaters and drooling minis


Hope She likes them

Till I sew next!

Wednesday, January 4, 2012

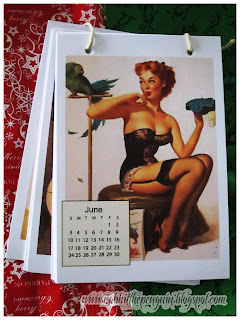
Pin Up Girls 2012 Calendar

I was busy sewing and shopping for everyone when I suddenly remembered that I had completely forgotten about my very single 50 over years old uncle who
cooked our Christmas dinner and who shared meals with us everyday for the pass couple of months!
Everyone will be getting something except for him if I didn't think of something quick!
So here's what I made for him

A 2012 Pin Up Calendar Girls from the early 1900s!
You can find Pin Up Girls on the net for free these days just by typing in "Pin Up Girls"
Got a few pictures,
added a 2012 calendar of every month on them
Customized a front calendar cover with his name on it
and wrap it up with a string
(because I ran out of cellophane tape!)

So here they are
The Vintage Girls of 2012! 


"James Yong Lolita Girls 2012"


Till I craft next

Quick Travel Journal

I made a super duper last minute Travel Journal for my Brother in Law, David, during the wee morning of the day he was flying off back to Chile.
I wanted to do it earlier but I never seem to find the time, and ever since dad checked in for his Knee Replacement surgery, I have to split myself even more. 
It's easier to concentrate now with my holiday being over :)
Anyway,
I know I could have probably done something better or sew something to hold the pieces together but I was dying for sleep at 5 that morning.

I don't quite remember where I got some of the free printable templates but I do know I browsed through a cool site with lots of crafty tips. Check at the end of the post for the link to the page :)


The assembled piece!


Some were free printables, some were created by yours truly :)


Passport stamps from all over the world!!!
Well, Okay, not all over but a whole lot of countries, Including Malaysia and Chile of course!


I chose this font because I think Miguel somewhat owns the same handwriting...
It's hard to tell.
Lefties are always ugly handwriters :p


I had no Glue left at this point!
Like I said,
Super last minute.
So sewing was a great option!


Some, again,
are free Digital papers
I really do want to give credits but I seriously forgot where I got them from :(


Postcard Pictures time!
Yes! That's a real Python around his neck!


You'll never see this postcard in stores ever!
A mother Orang Utan Lovingly Smelling the bum of her little Orang Utan


Taken  at Poring Hot Springs - Ranau, Sabah


The print in the bottom reads:
400 over meters above sea level
100 over meters tall Canopy Walk!
I did this when I was 8 mths pregnant and did this again while David was around.
It is always scary in the beginning. The scariest of all would have to be the last walk. 
Not for those with a faint heart!
Supported only by cable ropes, a piece of plywood plank and an aluminium ladder!


Oh, and did I mention that I took these pictures???
:D
I love the one on the left where Miguel looks up towards the sky with huge clouds.
Taken at Kundasang - Ranau, Sabah.
Excellent picture for a brother to brother message

Malayan Tiger on the right


Envelopes for memory keepsakes and little tiny things like entrance tickets, train dockets, flyers etc for remembrance


He absolutely loved it!
shhhhhhh!!! Do not tell but it actually made both brothers cry!

NOW
Head on to Tip Junkie to browse through for some free printables :)

Till I craft again :)